
Toilet Leaking From the Bottom? Here's Why

Toilet Leaking at the Base — Water, Wobble, and Odor All at Once
Read full question
Looked under the bathroom vanity the other day and noticed a small puddle spreading across the tile right at the foot of the toilet. Now that I'm paying attention, there seem to be three things wrong at the same time: water pooling at the base after every flush, a slight rocking motion when I sit down, AND a faint sewer smell that wasn't there before. My small bathroom already feels cramped, so having a wet floor on top of everything else is driving me crazy.
I've blotted the water dry a couple of times and it keeps coming back — always seems to show up right after someone flushes, not just randomly throughout the day. The toilet itself is several years old and I can't remember it ever being serviced. Not sure if all three symptoms are connected or if I'm dealing with multiple separate issues.
Quick Answer
Water at the base of a toilet is almost always caused by one of three things: a failed wax ring seal, loose closet bolts allowing the toilet to rock, or — less dramatically — condensation or a leaking supply connection that's being mistaken for a base leak. The rocking and sewer smell Larry describes strongly point toward a compromised wax ring, which will need to be replaced before the situation causes subfloor damage.
The Myth Worth Clearing Up First
A very common assumption is that water at the base of a toilet automatically means you need to pull the whole toilet and replace the wax ring. That's sometimes true — but it's the conclusion, not the starting point. Before you grab a wrench, it's worth spending five minutes ruling out simpler causes, because chasing the wrong one wastes time and can send you down a more complicated repair than you actually need.
Here's the short version of what actually causes water at the toilet's base — and how to tell them apart.
Rule Out the Easy Stuff First
Condensation (Tank Sweating)
In humid conditions, a cold porcelain tank can sweat enough water to drip down the outside of the bowl and pool on the floor, looking exactly like a base leak. The tell: the water appears whether or not anyone has flushed recently, and it's worse in summer or in humid bathrooms with poor ventilation. If this is your situation, the fix is improving air circulation or installing a tank liner — no plumbing work required.
Loose Supply Line or Tank Connections
A slow drip from the supply line fitting or the tank-to-bowl bolts can travel along the porcelain and collect at the base. Dry the whole toilet thoroughly with a paper towel, then watch closely with a flashlight while the tank refills. If you see water forming anywhere above the base, that's your culprit — and tightening the fitting or bolt (carefully — snug only on porcelain) may solve it entirely.
When It's Clearly Post-Flush
Larry's description — water appearing right after a flush, combined with rocking and a sewer smell — is a textbook presentation of a wax ring that's no longer sealing properly. The three symptoms are absolutely connected: the toilet is rocking on loose closet bolts, which breaks down the wax seal over time, which then lets both water and sewer gas escape with every flush. All three symptoms share one root cause.
What You're Actually Dealing With: The Wax Ring
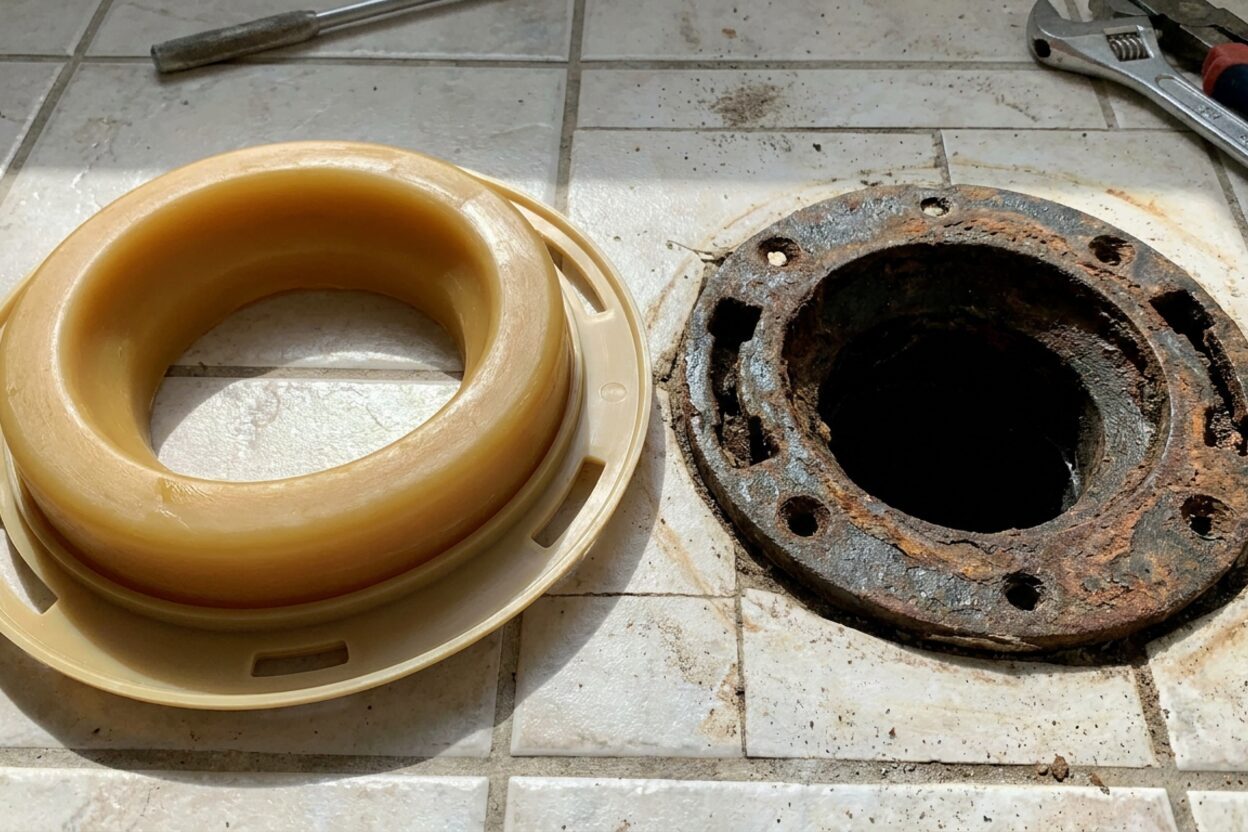
The wax ring is a soft, compressible gasket that sits between the base of the toilet horn (the outlet at the bottom of the bowl) and the closet flange in the floor. It creates an airtight, watertight seal. When a toilet rocks — even slightly — it grinds against that wax, eventually wearing a gap. Once the gap opens, wastewater escapes during every flush and sewer gas vents freely into the bathroom. The longer it goes on, the more subfloor damage accumulates underneath, so this is worth addressing promptly.
What You'll Need
- Adjustable wrench or channel-lock pliers
- Putty knife or scraper
- Wax ring (standard or extra-thick — choose based on flange height; more on that below)
- New closet bolt set (replace these while you're in there)
- Bucket and old towels or rags
- Sponge
- Rubber gloves
- Hacksaw (if the old bolt stems need trimming after reinstall)
How to Reset the Toilet and Replace the Wax Ring
- Shut off the water supply. Turn the shutoff valve (angle stop) clockwise until it stops. Flush the toilet to empty the tank, then sponge out any water remaining in both the tank and the bowl. Disconnect the supply line from the bottom of the tank.
- Remove the caps and closet bolt nuts. Pry off the plastic caps at the base, remove the nuts and washers from the closet bolts, and set them aside. If the bolts spin freely, grip them with pliers while you turn the nuts.
- Lift the toilet straight up. Toilets are heavy — one-piece models in particular can exceed 100 lbs, and even two-piece bowls are awkward and back-straining. Check your model's spec sheet if you need an exact figure, but assume it's heavier than it looks. Get a helper — this is a two-person lift. Lifting a toilet solo is a realistic back-injury risk regardless of how manageable it looks. Lift with your legs, keep the load close to your body, and set it down on cardboard or old towels to protect the floor. Lift straight up without twisting to break the old wax seal cleanly.
- Inspect the flange before you do anything else. Look at the plastic or cast-iron closet flange sitting in the floor. If it's cracked, broken, or sitting noticeably below the finished floor level, stop here and call a licensed plumber. A flange that can't properly support the toilet will cause the new wax ring to fail the same way — and flange repair or replacement often involves work that varies significantly by local plumbing code.
- Scrape away the old wax. Use the putty knife to remove all traces of old wax from both the flange and the bottom of the toilet horn. Clean surfaces are essential for the new ring to seat properly.
- Install new closet bolts. Slide the new bolts into the slots in the flange so they'll align with the bolt holes in the toilet base. On most standard installations they'll end up roughly parallel to the wall behind the toilet, but let the flange slot positions and toilet hole spacing guide placement, not wall orientation.
- Press the new wax ring into place. Most installers press the ring onto the toilet horn (wax side outward) before lifting the bowl into position — this gives you better visual control. Wax ring selection depends on how far the flange surface sits above or below your finished floor. Measure the offset: if the flange sits flush with or slightly above the floor, a standard ring is typically appropriate; if it's recessed, an extra-thick or double-stack ring (or a flange extender) may be needed. Check the ring manufacturer's spec sheet for the offset range each product is designed to handle.
- Lower the toilet carefully onto the flange. Align the bolt holes in the base with the closet bolts and press straight down with your body weight — sit on it, even — to compress the wax fully. Do not rock or wiggle it; that displaces the wax unevenly.
- Secure the nuts. Place washers and nuts on the bolts and tighten them in alternating passes — a little on the left, a little on the right — until the toilet sits firmly without rocking. Stop there. Porcelain cracks from overtightening; the goal is stability, not maximum torque. If the toilet still rocks slightly, recheck flange contact before adding more nut pressure. Trim any excess bolt length with a hacksaw and replace the caps.
- Reconnect and test. Reattach the supply line, turn the shutoff back on, let the tank fill, and flush several times while watching the base closely. Dry the area completely first so any new moisture is immediately obvious.
The Caulking Question
Once the toilet is reset, you'll face a decision about whether to caulk the base to the floor. Some local plumbing codes require caulking the toilet base to the floor — check your jurisdiction's requirements before finishing the job. Whether or not it's required in your area, caulking does help prevent the toilet from shifting and keeps the base easier to clean. On the other hand, some experienced plumbers deliberately leave the rear of the base un-caulked, so that if the wax ring ever fails again, the water escapes visibly onto the floor rather than pooling hidden underneath and rotting the subfloor. Both approaches have legitimate reasoning behind them. If you choose to caulk, use a mildew-resistant silicone and leave a small gap at the back if you want the early-warning benefit.
When to Call a Pro Instead
This job is solidly in DIY territory for most homeowners — but a few situations call for a licensed plumber: a cracked or sunken flange, a cracked bowl, any work involving a lead bend or cast-iron drain, or if after a successful reset the sewer smell persists. A persistent smell after a fresh wax ring seal is in place can indicate a different issue entirely, and that's worth a professional's eyes. For more help with related repairs, browse our wax ring and flange guides.
 Oatey Fix-It Stainless Steel Flange Repair Ring, Adjustable Toilet Flange Repair Kit for Broken or Cracked Mounting Flanges, Secure Seal
View on Amazon →
Oatey Fix-It Stainless Steel Flange Repair Ring, Adjustable Toilet Flange Repair Kit for Broken or Cracked Mounting Flanges, Secure Seal
View on Amazon →
 Fluidmaster 7511 Toilet Wax Ring with Flange and Bolts
View on Amazon →
Fluidmaster 7511 Toilet Wax Ring with Flange and Bolts
View on Amazon →

Still need help? Ask a Plumbing Expert AD
Get a personalized answer from a verified plumbing expert. Describe your issue and get step-by-step help.