
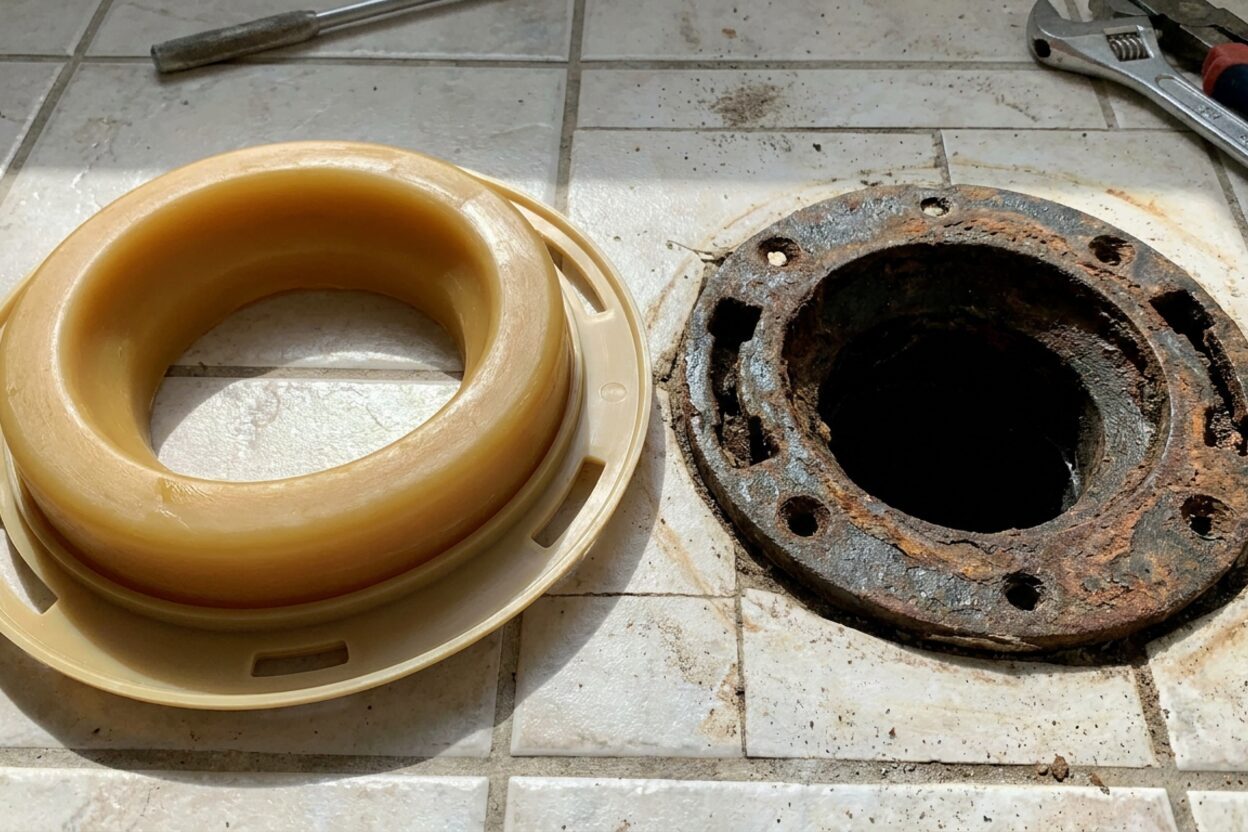
How to Replace a Toilet Wax Ring (Step-by-Step)

Sewer smell at the base — do I need a new wax ring?
Read full question
Nobody wants to walk into the bathroom and catch that unmistakable sewer-gas smell drifting up from around the base of the toilet. Mine has been giving off a faint but definite odor, and when I kneel down close to the floor I can feel a slight dampness on the tile right after a flush — not a puddle, just a hint of moisture. The toilet rocks ever so slightly when I sit on it, which makes me think the seal underneath has finally given out.
I've owned the house about five years and this toilet was here before I moved in, so I have no idea when the wax ring was last touched. I'd like to tackle this myself on a weekend if it's a reasonable DIY job. What's the best approach for replacing the wax ring, what parts should I grab, and are there any traps I should watch out for before I commit to pulling the whole toilet?
Quick Answer
A failed wax ring is a common culprit when you notice sewer odor or moisture at the toilet base after flushing. Replacing it means shutting off the water, lifting the toilet, scraping out the old wax, pressing in a fresh ring, and reseating the toilet. The job is very doable for a careful DIYer with a helper and basic tools.
Before You Pull the Toilet — Rule Out the Easy Stuff
A rocking toilet and a faint sewer smell after flushing are classic signs of a failing wax ring, but it's worth spending two minutes eliminating simpler causes before committing to a full lift. Condensation (tank sweating in humid weather), a loose supply-line connection, and a slightly loose closet bolt can all deposit moisture at the base without any wax failure at all.
- Is the moisture only there in hot, humid weather, even without flushing? That points to condensation running down the outside of the tank, not a wax failure.
- Does it appear only right after a flush, directly under the base? That points to the wax seal or a loose closet bolt.
- Is there any movement when you sit on the toilet or push it side-to-side? Even small rocking can break a seal over time and is a strong indicator the wax ring needs attention.
If the moisture appears right after flushing and the toilet has any wobble, a wax ring replacement is almost certainly the right call. For the toilet flange repair side of things, our wax ring & flange guides cover related issues in more depth.
Choosing Your Wax Ring: Three Options Side by Side
Not all wax rings are identical, and picking the right one for your situation will make the difference between a seal that lasts and one that fails prematurely.
Option 1 — Standard Flat Wax Ring
The traditional choice: a simple donut of petroleum-based wax, usually sized to fit a 3-inch or 4-inch waste line — the most common residential sizes, but confirm your drain size before purchasing.
- Pros: Inexpensive, universally available, and proven over decades of plumbing practice. Works perfectly when the flange sits flush with or slightly above the finished floor.
- Cons: Leaves no margin for error if the flange is recessed — if the flange sits below the floor surface, this ring won't bridge the gap reliably.
Option 2 — Extra-Thick or Reinforced Urethane-Core Ring
These rings are noticeably taller and are often built around a urethane foam or polyethylene core. Many come in kit form with new closet bolts, bolt caps, and retainer washers included.
- Pros: The right choice when the flange is recessed below floor level (common after tile work or floor replacement). Kits simplify sourcing all the hardware in one trip. The urethane core holds its shape reliably during installation.
- Cons: Costs more than a standard ring. If the flange is at the correct height, the extra thickness can actually over-compress and push wax up into the drain opening.
- Best for: Flanges that sit below the finished floor surface, older homes where the floor has been built up with multiple tile layers, or any situation where the toilet has always rocked slightly even after a previous wax-ring job.
Option 3 — Wax-Free Gasket (Silicone or Foam)
A newer category: reusable, compressible gaskets that bolt directly to the flange without any wax.
- Pros: No wax mess, repositionable if you don't quite line up the toilet on the first try, and adjustable for varying flange heights on some models.
- Cons: More expensive up front, brand-specific installation steps vary widely, and long-term field data is thinner than for traditional wax. Some plumbers are enthusiastic early adopters; others still prefer wax for its simplicity and proven track record.
- Best for: Someone who expects to pull the toilet again in the near future (bathroom renovation, for example) or who wants the cleanest possible installation process.
Bottom line: For most straightforward replacements where the flange is in good shape and at the right height, a standard wax ring does the job. If your floor has been tiled since the toilet was last set, measure the gap from the top of the flange to the finished floor and check the ring manufacturer's packaging for the gap range that product covers — go thicker if the flange sits below the finished floor surface.
What You'll Need
- Adjustable wrench or channel-lock pliers
- Putty knife or scraper
- Bucket, sponge, and old towels
- New wax ring (see above)
- New closet bolts (often smart to replace when you're already in here)
- Hacksaw or bolt cutters (to trim bolts to length after tightening)
- Gloves — disposable nitrile work well
- A helper for the lift
The Replacement Process
- Cut the water and empty everything. Turn the shutoff valve clockwise until it stops. Flush to drain the tank, then hold the handle down to get as much water out as possible. Use the sponge and bucket to remove whatever remains in the bowl and trap — this keeps the job clean and lightens the toilet slightly.
- Disconnect the supply line from the bottom of the tank. Have a towel ready; there will be residual water in the line.
- Remove the bolt caps and nuts. Pry off the plastic caps at the toilet base, remove the washers, and unscrew the nuts from the closet bolts. If the bolts spin rather than hold, grip the bolt with pliers while turning the nut.
- Lift the toilet. This is genuinely a two-person task — a standard toilet is heavy enough that awkward lifting solo risks back strain, and a fumbled grip can crack the porcelain or damage the floor. Lift straight up to break the wax seal, then set the toilet on its side on a folded old towel or cardboard to protect both the porcelain and your floor.
- Scrape and inspect the flange. Use the putty knife to clean all wax residue from the floor flange and from the toilet's outlet horn. Take a good look at the flange: cracks, corrosion, or a flange that sits well below the finished floor surface are call-a-plumber situations — a compromised flange needs repair or replacement before a new ring will hold, and a cracked or open flange can allow sewer gas into the living space. If you notice a persistent sewer smell at any point in this process, ventilate the area and consult a licensed plumber before proceeding.
- Set the new ring. Place the new wax ring directly on the flange, centered over the opening, wax side up. Some installers prefer to press it onto the toilet horn instead — either approach works as long as the ring is flat and centered before the toilet comes down.
- Lower the toilet carefully. Align the bolt holes over the closet bolts and press straight down with your body weight. Avoid rocking or twisting, which can smear the wax unevenly. Once the base contacts the floor, press firmly around the rim to fully compress the seal.
- Tighten the nuts alternately — snug, then a quarter turn more, alternating side to side. Do not crank these down hard; over-tightening cracks the porcelain base. Trim any protruding bolt length with a hacksaw, then snap on the bolt caps.
- Reconnect and test. Reattach the supply line, turn the water back on, and flush several times while watching the base closely for any moisture.
The Caulk Question
Whether to caulk around the base of the toilet is genuinely a matter of debate, and local plumbing code varies — check what applies in your jurisdiction. Many codes require it for sanitation reasons and to prevent the toilet from shifting. On the other hand, a number of experienced plumbers deliberately leave the rear of the base un-caulked so that any future seal failure shows up as visible moisture on the floor rather than quietly wicking under the base. If you do caulk, a thin bead of silicone-based caulk applied around the front and sides (leaving the very rear open) is a reasonable compromise that satisfies most code requirements while preserving that early-warning leak detection at the back.

Still need help? Ask a Plumbing Expert AD
Get a personalized answer from a verified plumbing expert. Describe your issue and get step-by-step help.