
Toilet Tank Slowly Draining Into Bowl? Here's Why

Why Does My Toilet Tank Drain Slowly Into the Bowl?
Read full question
Found something strange happening with my toilet — after every flush, the tank seems to refill okay, but then I notice the water level in the bowl is slowly dropping, like the tank is quietly leaking into it. Or maybe it's the other way around? I honestly can't tell. I'm retired and I've owned this house for a while now, but I've always just called someone for plumbing stuff and never really learned it myself.
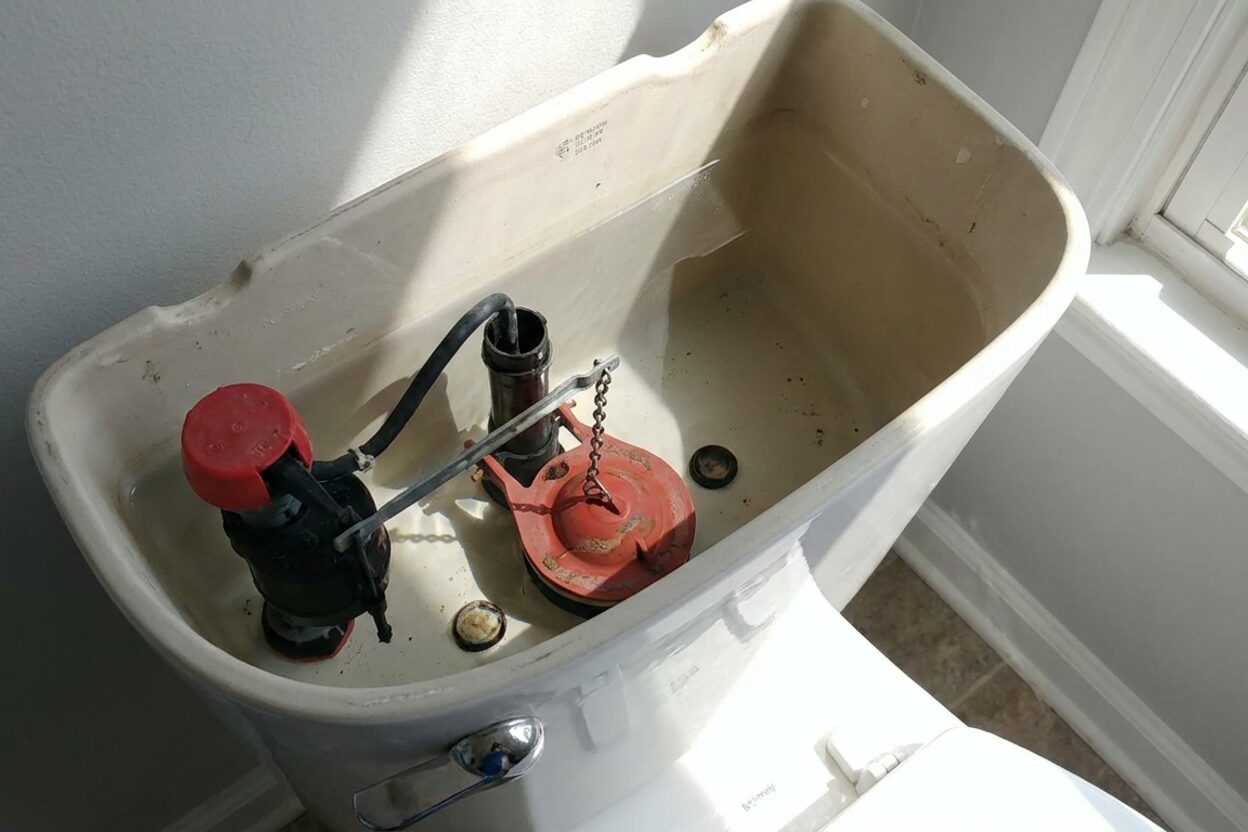
I opened up the tank lid to take a look and I can see the water is definitely trickling down into the bowl even when nobody's flushed. There's a rubber flap thing at the bottom of the tank and some kind of float and valve setup, but I don't really know what any of it does or which part might be causing the problem. The toilet doesn't run loudly — it's more of a slow, silent drain that I only noticed because my water bill ticked up a bit this month.
Quick Answer
A toilet tank slowly emptying into the bowl is almost always caused by a worn or warped flapper that no longer seals properly at the bottom of the tank. Less commonly, a cracked flush valve seat or a waterlogged float can also be responsible. The fix is usually inexpensive and beginner-friendly.
That Quiet Trickle Is Costing You Money — Here's Where to Start
What you're describing — the tank slowly seeping water into the bowl without anyone flushing — is sometimes called a "phantom flush" or a silent leak, and it's a very common toilet complaint. The good news: it's usually cheap and straightforward to fix. I'd suggest starting with the least expensive culprit and working your way up only if that doesn't solve it.
Before doing anything inside the tank, turn off the water supply at the shutoff valve (the oval handle on the wall behind or beside the toilet base). Turn it clockwise until it stops, then flush to empty the tank. Sponge out any remaining water so you can work without a mess. This is a must — skipping it just means wet floors and wet hands the whole time.
The Most Likely Culprit: A Worn Flapper (And It's the Cheapest Fix)
That rubber flap you noticed at the bottom of the tank sits over the flush valve opening and creates a watertight seal. When it's working correctly, water stays in the tank until you flush. When the rubber degrades, warps, or gets coated with mineral deposits, it can't hold a seal anymore — and water slowly seeps around it into the bowl.
Flapper lifespan varies quite a bit depending on your water chemistry and whether you use in-tank cleaning tablets (those blue or bleach-based ones are hard on rubber). It's a very common first failure point in older toilets.
The Dye Test — Free Diagnosis
Drop a few drops of food coloring into the tank — don't flush. Wait about 15 minutes. If color shows up in the bowl, the flapper isn't sealing. That's your answer without spending a cent on parts yet.
Replacing the Flapper
Many flappers are designed to be compatible across common flush valve sizes (typically 2-inch or 3-inch), but fit varies — some brands use proprietary designs that require a specific replacement. Replacement ones are widely available at any hardware store. You'll want to bring the old one with you, or note the toilet's brand and model (usually stamped inside the tank lid) to confirm fit. Installation takes just a few minutes:
- With the water off and tank emptied, unhook the old flapper from the pegs on the sides of the flush valve and disconnect the chain from the flush handle arm.
- Hook the new flapper onto the same pegs and clip the chain to the handle arm, leaving just enough slack that the flapper seats fully when the handle is at rest — typically a small amount of slack, adjusted until the toilet flushes cleanly and the flapper reseals without the chain getting caught underneath.
- Turn the water back on, let the tank fill, and repeat the dye test to confirm the leak is gone.
Tools needed: Just your hands, a sponge, and a bucket. No tools required for a basic flapper swap.
If a New Flapper Doesn't Fix It: Check the Flush Valve Seat
If you install a brand-new flapper and the dye test still shows leakage, the problem may be the flush valve seat — the ring the flapper presses against. Over years of use, this seat can develop mineral buildup or small cracks that prevent even a new flapper from sealing properly.
Run a finger around the flush valve seat (with the tank empty). If you feel rough deposits, you can try scrubbing them away gently with fine steel wool or a scotch-brite pad. If you feel a crack or chip, the flush valve itself needs replacing — a more involved job, but still a DIY-friendly one for someone comfortable following step-by-step instructions. You'll find guidance in our fill and flush valve section.
Other Possibilities Worth Ruling Out
Float Set Too High
If the water level in the tank is sitting right at or above the top of the overflow tube (the tall open tube in the center of the tank), water is constantly spilling into the bowl through that tube — not through the flapper at all. This isn't a slow leak so much as a continuous overflow. You can fix it by adjusting the float downward so the water level sits roughly one inch below the top of the overflow tube — or at the marked waterline inside the tank if one is present; check your toilet's manufacturer instructions for the precise recommended level. On a ball-float style, bend the float arm slightly downward; on a modern cup-style fill valve, there's usually a dial or clip to adjust. Note: if your fill valve has a critical-level (CL) mark printed on it, that mark must remain at least one inch above the top of the overflow tube at all times — this is a backflow-prevention requirement. Adjust only the float setting or float arm, not the overall height of the valve, unless you verify the CL mark stays above the overflow tube after repositioning.
Waterlogged or Cracked Float Ball
Older toilets use a hollow plastic or rubber ball on an arm to sense the water level. If the ball has cracked and filled with water, it never rises high enough to shut off the fill valve — meaning water keeps running in and eventually flows over or through the system. Shake the ball gently; if you hear water sloshing inside, replace it.
Tools and Parts You May Need
- Replacement flapper (correct for your toilet's flush valve size — typically 2" or 3")
- Sponge and small bucket
- Food coloring for the dye test (free diagnosis)
- Fine steel wool or scotch-brite (for mineral buildup on the valve seat)
- Replacement flush valve (only if the seat is cracked — more involved)
When to Call a Plumber
Most slow-tank-drain issues are a flapper or float adjustment, and both are genuinely beginner-friendly fixes. However, if you replace the flapper, clean the valve seat, and adjust the float and the leak continues — or if you find a crack in the tank itself — it's time to bring in a professional. A cracked tank is not a DIY patch situation. Similarly, if multiple fixtures in the house seem to be draining oddly at the same time, that points to the main line, not the toilet, and warrants a plumber's assessment.
Start with that dye test and a new flapper. For most people in your situation, that's all it takes.
 Korky 2017BP Standard 2-Inch 2X Ultra High Performance Universal Long Lasting Rubber-Easy to Install-Made in USA Toilet Flapper, 1 Count (Pack of 1), Red
View on Amazon →
Korky 2017BP Standard 2-Inch 2X Ultra High Performance Universal Long Lasting Rubber-Easy to Install-Made in USA Toilet Flapper, 1 Count (Pack of 1), Red
View on Amazon →
 Toilet Flapper Chain, Stainless Steel Toilet Handle Chain, 2 Pack Toilet Flapper Chain Replacement Kit 9.45'' Universal Toilet Chain Toilet Flush Lift Chain Adjustable Length Fits Most Toilet Flappers
View on Amazon →
Toilet Flapper Chain, Stainless Steel Toilet Handle Chain, 2 Pack Toilet Flapper Chain Replacement Kit 9.45'' Universal Toilet Chain Toilet Flush Lift Chain Adjustable Length Fits Most Toilet Flappers
View on Amazon →
 Toilet Fill Cycle Diverters overflow & Leak Detecting Dye-Tablets Tank Water Saver Pack, 2 Pack
View on Amazon →
Toilet Fill Cycle Diverters overflow & Leak Detecting Dye-Tablets Tank Water Saver Pack, 2 Pack
View on Amazon →

Still need help? Ask a Plumbing Expert AD
Get a personalized answer from a verified plumbing expert. Describe your issue and get step-by-step help.