
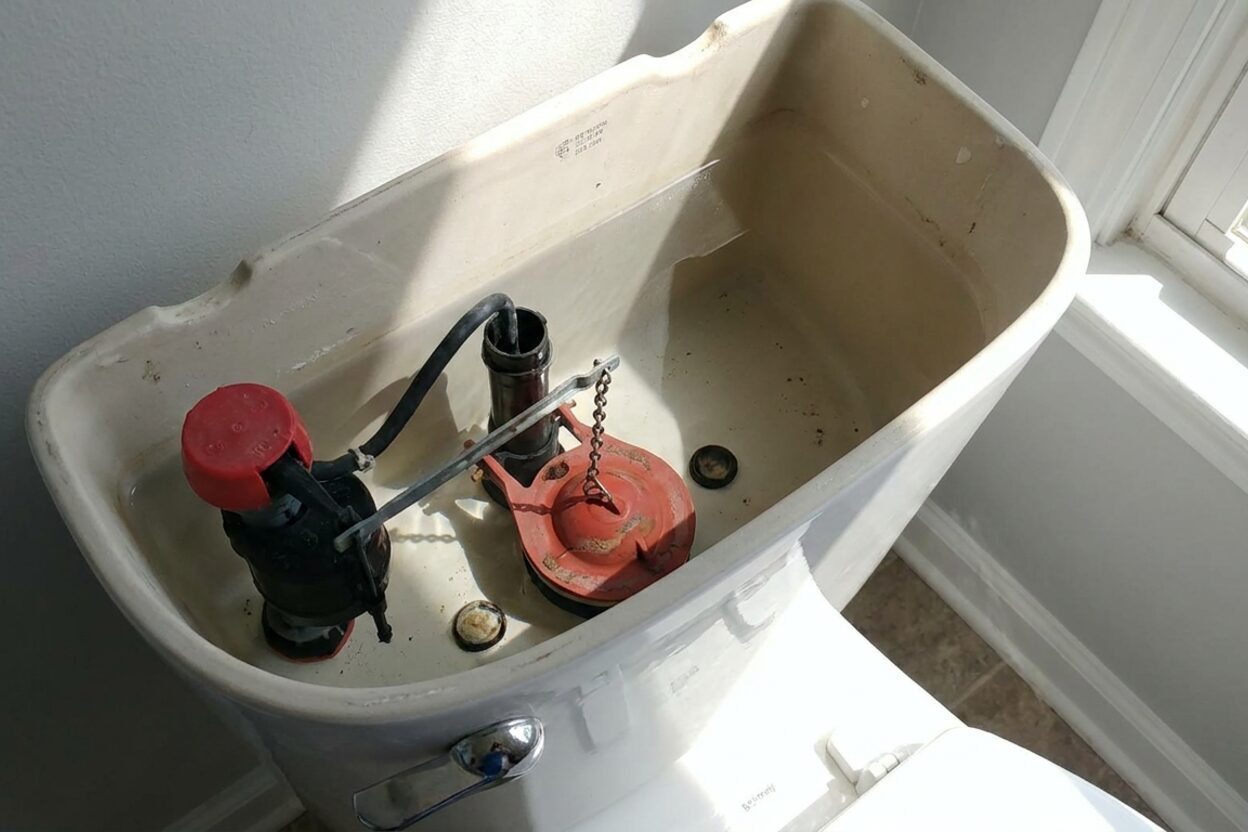
How to Fix a Toilet Chain That's Too Long

Toilet chain is too long — tried shortening it but still having issues
Read full question
Found out the hard way that a too-long toilet chain is apparently a thing when my toilet started running nonstop a few days after we moved in. Tried clipping the chain to a higher hook on the flush arm, re-hooking it at a shorter link, and even replacing the whole flapper assembly thinking that was the problem — still getting either a phantom flush every hour or a flapper that barely lifts when I flush. I've double-checked that the chain isn't kinked or tangled, and the flapper itself seats flat on the valve seat, but I can't seem to dial in the right length. Is there a correct amount of slack I should be aiming for, and is it possible I've been making this worse by going too short instead of too long?
Quick Answer
A toilet chain that's too long can get trapped under the flapper, causing the toilet to run constantly. The fix is straightforward: aim for about half an inch of slack, clip to the correct link on the flush arm, and trim any excess. The whole job takes under 30 minutes and needs no special tools.
What's Actually Going On — and Why Chain Length Matters More Than You'd Think
The toilet chain (technically the lift chain or flapper chain) has one job: pull the flapper up when you push the handle, then drop away cleanly so the flapper can seal. When the chain is too long, the excess coils or folds can slide under the rubber flapper as it tries to close. Even a small piece of chain caught under the seal is enough to hold the flapper open a fraction of an inch — which is all it takes to let water bleed continuously from the tank into the bowl. That's the running toilet and phantom flushing you're hearing.
Going too short is the opposite problem: the chain pulls the flapper open under tension even when the handle is at rest, or it prevents the flapper from settling flat. Both ends of the spectrum cause trouble, which is why dialing in the right length is the actual fix — not just replacing the flapper.
Do This Right Now: Shut Off and Assess
Before adjusting anything, turn off the supply shutoff valve (the oval or football-shaped handle on the wall behind the toilet, near the floor). Turn it clockwise until it stops, then flush once to drain the tank. You don't need to sponge the tank completely dry for this job, but emptying it prevents the fill valve from cycling while your hands are in there and gives you a clear view of how the chain is behaving.
Lift the tank lid and set it safely aside on a towel — tank lids are heavier than they look and crack easily. Now look at where the chain is currently clipped on the flush arm (the metal or plastic lever connected to the handle) and count the available holes or links. Note how much excess chain is hanging below the clip point.
Getting the Length Right
The target is approximately half an inch of slack — roughly the width of your thumb — when the flapper is fully seated and the flush arm is at rest. The exact amount can vary slightly by toilet design; the principle is that the chain should have no tension at rest but should lift the flapper fully and immediately when the handle is pressed. Here's how to set it:
- Find the correct link. Hold the chain taut from the flapper ring straight up to the flush arm. Find the link that sits at the arm with just that small amount of slack — not pulling tight, not drooping in a large loop.
- Clip to that link. Most chains use a small S-hook or clip that snaps into a hole on the flush arm. Clip it at your chosen link. If the clip is stiff, needle-nose pliers help seat it without bending the arm.
- Trim the excess. Any chain hanging below your clip point is the culprit. Cut it off with wire cutters or sturdy scissors, leaving just two or three links below the clip as insurance. Don't leave several inches dangling — that extra length is what ends up under the flapper.
- Test before you close up. Turn the supply back on, let the tank fill, and do three or four full flushes. Watch the chain each time: it should lift the flapper fully on the flush stroke, then fall away cleanly with no slack pooling near the seal. If the toilet continues to run, peer in and watch whether any part of the chain is touching the flapper seat — reposition if needed.
When Adjusting Isn't Enough
If you've trimmed the chain and set the slack correctly but the toilet is still running, the chain itself may not be the only issue. A few things worth checking:
- Flapper condition. Rubber flappers degrade over time — the rate varies with water chemistry and cleaning products used in the tank. In-tank bleach or drop-in cleaning tablets in particular are known to accelerate rubber flapper degradation and are worth avoiding if you find yourself replacing flappers frequently. A warped, hardened, or mineral-coated flapper won't seal even with a perfect chain. Press down on the flapper with your finger while the tank is full: if the running stops immediately, the flapper needs replacing. Most flappers are universal or adjustable fit, so a standard replacement from any hardware store will likely work — just match it to your flush valve seat diameter — measure yours before buying, as sizes vary by toilet model. Most hardware stores carry adjustable or multi-fit flappers that accommodate common sizes.
- Flush arm position. If the flush arm sits at an unusual angle because it's bent or the handle bracket is loose, the chain geometry changes even when the length looks correct. Tighten the handle nut — note that some toilets use a reverse-threaded handle nut, so if turning one direction feels like it's loosening, try the other. Check your manufacturer's instructions if unsure, and tighten only until snug; porcelain can crack from overtightening. Straighten a bent arm if possible.
- Chain clip hole selection. Most flush arms have multiple holes at different positions along the arm. Moving the clip point closer to the handle pivot gives more lift with less arm movement — useful if the flapper feels sluggish on a partial flush. The middle holes on the arm are a reliable starting point for most standard setups.
For more context on how the flapper and chain interact with the rest of the flush system, our flapper and chain repair guides cover related issues you might run into as you work through this.
One Thing That Can Wait (But Shouldn't Be Ignored)
If after all adjustments the toilet runs intermittently — say, it fills briefly every hour or so without anyone flushing — that phantom cycling almost always points to a slow leak past the flapper rather than a chain problem at that point. A quick dye-tablet test (drop a dye tablet or a few drops of food coloring in the tank, don't flush, and check in 15 minutes whether color appears in the bowl) will confirm it. If color migrates into the bowl, the flapper seal is the remaining issue, not the chain. That fix is equally simple, and it's not urgent in the same way a burst line would be — but a running toilet wastes a meaningful amount of water over days and weeks, so it's worth wrapping up sooner rather than later.
 Korky 2017BP Standard 2-Inch 2X Ultra High Performance Universal Long Lasting Rubber-Easy to Install-Made in USA Toilet Flapper, 1 Count (Pack of 1), Red
View on Amazon →
Korky 2017BP Standard 2-Inch 2X Ultra High Performance Universal Long Lasting Rubber-Easy to Install-Made in USA Toilet Flapper, 1 Count (Pack of 1), Red
View on Amazon →
 Toilet Flapper Chain, Stainless Steel Toilet Handle Chain, 2 Pack Toilet Flapper Chain Replacement Kit 9.45'' Universal Toilet Chain Toilet Flush Lift Chain Adjustable Length Fits Most Toilet Flappers
View on Amazon →
Toilet Flapper Chain, Stainless Steel Toilet Handle Chain, 2 Pack Toilet Flapper Chain Replacement Kit 9.45'' Universal Toilet Chain Toilet Flush Lift Chain Adjustable Length Fits Most Toilet Flappers
View on Amazon →

Still need help? Ask a Plumbing Expert AD
Get a personalized answer from a verified plumbing expert. Describe your issue and get step-by-step help.